IT 서적/Spring Security In Action
ch02 : 스프링 시큐리티 기본 인증 - 1
SH.DevBlog
2023. 12. 28. 12:49
# 스프링 시큐리티 실행
- 스프링 시큐리티를 import 한 후, 실행하면 아래와 같은 문구가 생긴다.
- Using generated security password: 6a624793-0bfe-4deb-8d24-d0a0ee97335a
- 단순히, curl http://localhost:8080/hello 라는 명령어를 사용하면 아래와 같은 응답값을 얻을 수 있다.
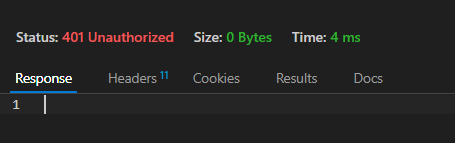
- HTTP 401 권한 없음이 반환됐는데, 이는 인증을 위한 올바른 자격 증명을 제공하지 않았기 때문이다.
- 위와 같은 상황에서 다시 명령어를 아래와 같이 주면 다음 결과를 얻을 수 있다.
- curl -u user:6a624793-0bfe-4deb-8d24-d0a0ee97335a http:localhost:8080/hello

# 테스트용 사용자 임시 추가 및 실행 결과
- 아래와 같이 UserDetailsService와 passwordEncoder를 재정의하여 사용할 수 있다.
- 실무에서는 아래와 같은 방식은 사용하지 않고 테스트용으로 작성한 것이므로 참고용으로만 보면 좋을 것 같다.
@Configuration
public class ProjectConfig {

    @Bean
    public UserDetailsService userDetailsService() {
        var userDetailsService = new InMemoryUserDetailsManager() ;

        var user = User.withUsername("john")
                .password("12345")
                .authorities("read")
                .build() ;
        userDetailsService.createUser(user);

        return userDetailsService ;
    }

    @Bean
    public PasswordEncoder passwordEncoder() {
        return NoOpPasswordEncoder.getInstance() ;
    }


}
# 결과
- curl -u john:12345 http:localhost:8080/hello
